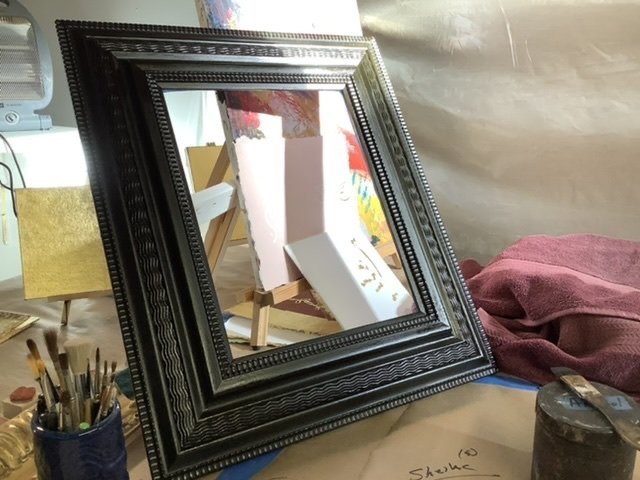
The Antique Dutch Black Frame
Antique Dutch Black Frame

From Rembrandt to Vermeer

The Classic 17th c Dutch Black Frame for Contemporary Works Of Art.

Creating The Dutch Black Frame Finish

The predilection for frame finishes during 17th century Holland steered away from the opulence of the gold leaf gilded frames being produced at the time in France and Italy. Tastes tended more towards simpler, earthier tones as seen on the frames of Vermeer and Rembrandt and as shown on Rembrandt's early self-portrait which hangs today at the Rijksmuseum in Amsterdam. Many of the early, ripple-style frames, however, were actually manufactured in countries such as Germany and Spain and thought of as 'Dutch' because of their extensive use in Holland.

Frames were often painted black in a form of ebonizing, due to the limited availability and cost of ebony. Considering the wide use of this approach this Classic 17thc Black Frame Finish has come to be known in certain circles as Dutch Black and remains a popular choice for contemporary works of art.

Creating The Dutch Black Frame Finish

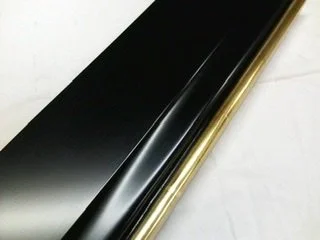
Charles Douglas has spent twenty-five of his forty years gilding perfecting the Dutch Black Finish and uses a variety of approaches. The method used to achieve a deep, antique umber-black tone involves painting a custom blend of several colors of casein paint onto finely sanded wood. Numerous layers of ruby shellac are brushed or padded on, depending on the shape of the frame profile, hand-rubbed between layers.

His Online Class: Creating The Antique Dutch Black Finish is offered several times throughout the year and takes students through each step of the process from sealing the wood frame and preparing the tri-color mix of Casein paint to applying the required eight coats of custom-mixed Ruby Shellac and extensive hand-rubbing. Pumice powder, steel wool, and rottenstone are among his treasured materials. A final addition of mordant gilding in 6k white gold leaf or 23k gold leaf along the inner edge of the frame with a wash of either black or raw umber casein sets off the understated elegance of this Classic Black Frame Finish.

For a somewhat more contemporary variation he also developed his version of what he refers to as Early American Black, based on original techniques used in in both America and Holland during the 17th and 18th centuries. This exquisite Finish combines lampblack pigment and ruby shellac, prepared in his studio from shellac flakes and alcohol. As many as ten coats are applied, each layer hand-rubbed. Early American cabinetmakers referred to this finish simply as Black Varnish.

The use of Dutch and Early American black frames offer an excellent choice on certain works of art such as portraits in oil as well as for mirrors. The overall tone of the Finish can be represented as modern, smooth and free of distress, or enhanced with various antiqued effects, a vocabulary achieved through added mediums including the deposit of gray and umber pigments in crevices, washes, and rubbing-through to the wood on high points to signify age. Often, a simple and occasional  rub-through to the wood and moderate distress provides the most attractive and sophisticated finish.

A Touch Of Gold

An added touch of gilding along the inner edge of certain frame profiles can provide an appropriate segue for certain works of art, often toned with either a black wash over silver or white gold leaf or raw umber over 23k gold to soften the transition from frame to art. ~

For further reading on the history of the Dutch Black Finish, the style of Dutch Ripple Moulding and the framing of Vermeer’s paintings in particular visit Essential Vermeer.

Online Classes

For those interested in exploring the Online Class: Creating the Antique Dutch Black Finish Visit the section Book a Gilding Class to Register. Charles will follow up with a Materials list and helpful links upon registration.

Sgraffito

Sgraffito: The Art of Etched Egg Tempera

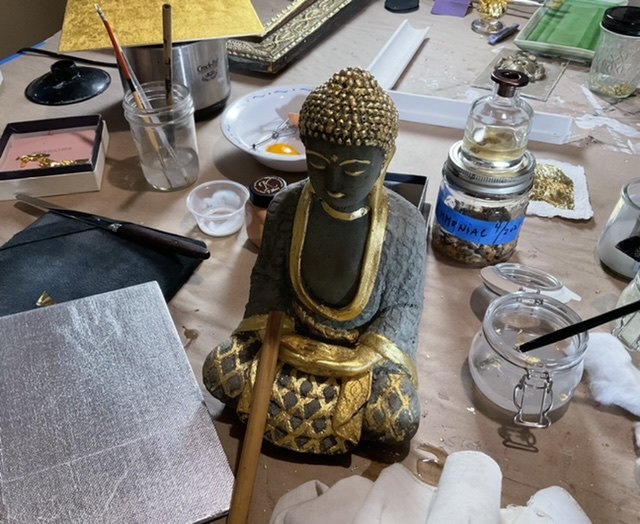
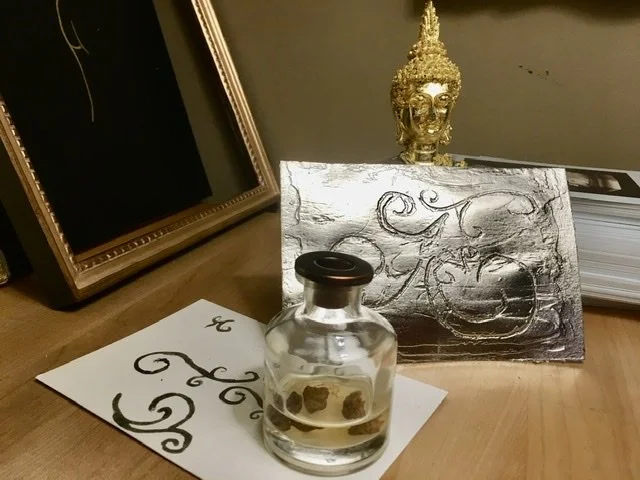
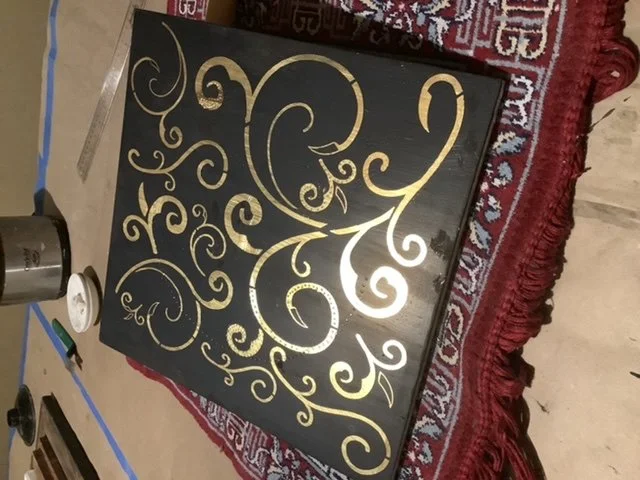
There are many different treatments that can be added to gilding. Sgraffito is one of my many favorites. It’s a technique that like much of gilding has a very long history. It is also used on pottery to reveal an underlying painted surface but with traditional gilding it’s the application of Egg Tempera paint over the burnished water gilded gold leaf where a design is then etched through the paint to reveal the bright gold ground.

Sgraffito a beautiful technique that requires skill in the drawing and etching as well as in the traditional water gilding technique. I have found, however, that it’s also quite possible to perform Sgraffito over a mordant gilded surface using either oil size or a contemporary water based acrylic emulsion using any of the leafs available, from genuine 24k gold, White Gold, and Palladium leafs to Genuine Silver, Brass, and Aluminum leafs.

How To Make Egg Tempera

To prepare the egg temper paint first the pigment of choice is spooned onto a mixing plate. Slowly add distilled water through an eye dropper a few drops at a time. Using a small Conservator’s Spatula blend the pigment and water until the pigment is saturated but not runny. You want a paste-like mixture where you can draw up peaks when pulling up with the flat end of the spatula. When this is done you’re ready to prepare the egg tempera.

The egg tempera paint is prepared in the same manner used as the egg tempera artist: the pigment is made wet with the water and then the yolk is carefully separated from the white of the egg so the yolk doesn’t break. The egg should be fresh and preferably Organic from well-fed Hens, otherwise the yolk will easily break in your hands if it’s old.

The yolk is rolled from one hand to the other, wiping your hands on a paper towel as you go along until the outside of the yolk feels dried from the surrounding white.

The yolk is then held between your fingers in a ball and pinched or poked with a clean needle and the inside of the yolk is poured out into a small bowl. This separates the sack around the yolk which can then be pulled away allowing a smooth liquid yolk to be used as your tempera. The larger half of the egg shell is then used to measure and add one shell of distilled water into the yolk, gently stirred for thinning.

Now that the pigment, water, and egg tempera are prepared, combine equal parts of the wet pigment and egg tempera and blend them well while using the eye dropper to add a little extra water as needed for a thin consistency.

Applying Egg Tempera To Gold Leaf

The egg tempera paint is now applied to the water gilded surface, directly over the unprotected gold leaf. A little yolk or water may be added a drop or two at a time as needed while painting. A very important element to this technique is to keep the coats of egg tempera paint very thin. This is crucial, otherwise the paint can crack and peel over time but when applied thin can hold up wonderfully well. The paint will dry to the touch fairly quickly but allow it to set a bit until it appears flat and so the previous coat is not disturbed by the next coat. I find five thin coats sufficient for an opaque covering over gold leaf.

Being mindful not to accidentally scratch the surface in unwanted areas the etching can be done after an hour or so although I generally wait till the next day. During the Online Sgraffito classes the etching is done the following week and in my studio tests I find two weeks still allows an appropriate window to etch through the paint.

Granito: Punchwork and Incising

Burnished water gilded gold leaf has that unmistakeable glow that is revealed through Sgraffito which can be further highlighted with Punchwork where small  metal Punches, Agate Burnishers, or other such tools are used to tap small embossed patterns into the gilded gesso, catching and throwing the shimmering light which adds a touch of sparkle and complexity. This technique known as Granito it is also effective when used together with the use of a pointed agate burnisher to create incised lines that are drawn along a straight-edge compressing the gold into the gesso and boled surface that can appear as rays of light, often used as such in Iconography. Halos are drawn this way, often with use of a compass.

These design elements were used extensively during the Renaissance  although as Daniel Thompson points out in his book Medieval Painting the passage of time has reduced the brilliant effects of these embellishments to where our imagination needs to consider what this must have looked like when they were originally gilded.

Design templates are often a good way to create beautiful patterns with this ancient method. Those who are skilled Fine Artists will find this technique an extraordinary path for expression. ~

Sgraffito Classes

For those interested in learning Sgraffito there are various Online opportunities to learn this technique through Charles Douglas Gilding Studio. 3-Day Masterclasses are offered throughout the year as well as being a component of the 12 Week Online Course Water Gilded Panels: from Pastiglia to Sgraffito. There may also be upcoming In Person opportunities for 2023-2024. Visit the schedule on the Book-a-Class tab for the next Sgraffito class!

Book Edge Gilding

How To Gild Book Edges

An Introduction to the Art of Book Edge Gilding

There’s something about the simplicity of gilding book edges which draws me, the beating of the egg white to make glair, lining the book up in the Finishing Press, laying the glair along the edges, padding on the bole, polishing and burnishing, laying the gold…

There’s not much mess or any dust and the result is simply beautiful, the book’s edges shining with bright 23-24k gold leaf, the color of the clay bole coming through in areas where I guide that to happen or simply leave it when it does so on its own.

I have them lined up in my tall Mahogany-colored bookcase, each book end showing its own personality with the colors of the bole sometimes see, blues, greens, red.

Perhaps one day I’ll teach this class in-person. For right now Online lends itself well to the method since there’s drying time to consider, much like other forms of gilding, but since a book edge is perhaps 7-12 inches in general each process can be fairly short so with the Online approach we can stop and come back, review recordings, ask questions along the way.

There are many approaches to gilding book edges, much of it due to the variety of papers that have been used for books over the years and the techniques in using them in books. Sometimes a closed bound book will have a perceptible ‘dip’ so this gilding is called Gilding in the Round. Another quite different form of bookmaking and therefore gilding is deckled edges of differing height; this gilding cannot be burnished due to this design so it’s called Rough Edge gilding. It’s simply gilded with the transparent glair (egg white) and is much more vulnerable to wear since burnishing not only makes gold leaf shine but also compresses it into the surface.

Students who attend this Online class learn the traditional and essential steps to successfully gild a bright gilded edge and a satin-toned Rough Edge including these various steps:

  • Prepare the edges of the book with powder

  • Line up the book edge in the Finishing Press

  • Sand to smooth the Book Edges

  • Prepare Glair (beaten egg white and separating the albumen)

  • Size the Book Edges

  • Prepare and Apply the Bole size

  • Polish the Bole

  • Apply the Glair Size and gild the edges in 23k gold leaf

  • Set the gold leaf

  • Burnish the gold leaf

For those interested in a Book Edge Gilding Class Visit the Book a Class section and browse the current schedule for class listings. And remember to look at the Archive a classes as well as all classes are both Live and Recorded so you may find a previous class Recording series is still available for Registration and Viewing.

A gilding kit has been put together especially for the class How To Gild Book Edges and is available through Gilded Planet. Students will learn how to gild the edges of a book that is already bound rather than gilding pages of books in production. This approach allows anyone with the tools, a Finishing Press and a book to gild its edges and is am enjoyable and relaxing way to learn one of the many methods of gold leaf gilding and how to gild the edges of books! ~

charles douglasComment
Gold Leaf Restoration

Gold Leaf Restoration: Ingilding, Casting, Toning

Learning how to restore gilded frames, furniture, and other gilded objects requires a wide spectrum of knowledge and fluency in the various methods and techniques of gilding. Proficiency in traditional water gilding, oil gilding, bronze powder applications is necessary in order to identify the particular gilded surface in order to properly restore it.

There is also the condition of the object itself to consider beyond the Finish, from frame mitres that have opened due to warpage and missing ornamental sections from impact damage  to the devastation that can occur from water and fire damage and insect infestation.

So where does this leave the beginning gilding student who yearns to learn to restore frames, whether as a skill set to add to their small business or to simply repair that frame that has been in their family for years and now in their care?

First, I always caution the student of Restoration not to to go beyond their current ability with objects in their care as this is how we lose historical antiquity which we can never get back if procedures taken are non-reversible. And I also believe that we should treat each object equally to avoid basing treatment proposals based on inaccurate valuations. A case in point is that compo ornamentation may not be held in such high esteem as exquisitely carved wood but a frame designed by Stanford White with its compo frame corners on a reeded profile is considered quite valuable and has been known to fetch $30,000 at Auction. It may be an extreme case in a world of proliferation of inexpensive production frame mouldings but still a relevant consideration from a Conservational viewpoint.

Regardless, there is a strong interest in the idea of restoration and I believe we all need to start somewhere. While it’s best to study the various methods of gilding first before progressing to the restoration of gilded objects I believe it’s possible to offer training of gilding methods and techniques within the realm of restoration. These include the steps involved in traditional water gilding:

Gold Leaf Restoration: Things To Learn

  • Making gesso to coat areas of gesso loss

  • Gesso putty for holes and gouges

  • Matching and preparing Clay Bole

  • Ingilding with genuine gold leaf

  • Blending and Toning

  • Ornament Moulds and Casting

  • Isolating Existing Finishes for Re-Gilding

These are all areas of importance in the field of gold leaf restoration, each of which we explore in both the Online and In-Person Gilding Classes that I teach throughout the year. Due to the complex nature of restoration the classes vary in their emphasis. The class Gold Leaf Restoration: Ingilding places an emphasis on laying 23k gold leaf accompanied with blending the gold leaf into an existing finish through burnishing, rubbing, and toning.

Restoration Versus Conservation

It’s also important to point out the essential difference between Restoration and Conservation, Restoration being the repair of an object to what would be considered its original intent whereby Conservation is dedicated to the pursuit of maintaining an object’s historical integrity and the original Finish wherever possible. My approach with projects has always been one of restoring a gilded object with a Conservational mindset and sometimes my treatment of a project is deemed less than what I do and more by what I don’t do.

Interested In A Restoration Class?

For those interested in exploring Gold Leaf Restoration as part of a career goal or to learn and acquire some of the basic skills that will allow you to begin restoring select picture frames or furniture Visit the Book A Gilding Class section at www.gildingstudio.com.

Classes for Gold Leaf Restoration will be held this Summer through Fall!

charles douglasComment
How To Make Gesso

Traditional Gesso

Traditional Gesso is the Foundation for so many aspects of art, from Traditional Water Gilding of Frames, Furniture, and Architectural Detail to Egg Tempera Gilded Panel Paintings, Pastiglia, and Iconography.

I first learned to make gesso over 30 years ago. It was at a time when not too many people were giving away their secrets. But there those who were leading the way, William Adair, Peter Sepp, Adair Chambers, Frances (Binnington) Federer, Stanley Robertson, Grace Baggot….

I started with a formula for gesso which was a one-step approach , gently building a mountain of calcium carbonate in a 10% solution of rabbit skin glue and water, spooning in the calcium carbonate (also known as Whiting) until it started to fall down along the sides of this mountain of Whiting. That was the sign that you reached the right ratio between Whiting, Glue, and Water.

Grace later lead me to her gesso recipe which she learned in England, an Old World formula that was based on a hard and soft gesso approach where the soft gesso contains more whiting than the hard gesso, building a pyramid of strength. I later came across this same recipe in the Publication Gilded Wood Conservation and History edited by Deborah Bigelow whose class on Toning Gilding I was fortunate to attend some years ago in NY. The gesso recipe was presented in the Paper Some Mechanical and Physical Properties of Gilding Gesso by Marion F. Mecklenburg among a Collection of Papers published in Gilded Wood in 1991 submitting that this particular recipe was shown to have the greatest strength and responsiveness in the analysis conducted.

Meanwhile, one more switch I made was to the Metric System for its greater precision in weighing by grams compared to the American system of cups and ounces and this approach has served me well throughout my years of gilding and remains the recipe I teach today.

Interlaggio: The Use of Fabric Under Gesso

I have found that when water gilding large flat surfaces, the gesso can have a tendency to develop hairline cracks. Fabric has been used for centuries for reinforcement of gesso and plaster surfaces and can help minimize or prevent these cracks from occurring. During the first step of water gilding - applying hot size (glue) to the wood surface - I like to size the front (and back if applicable) and let it dry 24 hours. The next day saturate the fabric with very warm size in a bowl and gently wring it out slightly. Lay the linen on top of the flat surface or panel and be sure the linen lies flat across the wood, smoothing out the wrinkles with your fingers. After the glue dries after 24 hours, trim any loose ends of the fabric.

Inspect the dried linen very carefully to see if there are any dried air pockets under the fabric. If there are, slice a small cut into the air bubble with a razor blade or an Exacto Knife and wet the area with saliva or a little warm rabbit skin glue to adhere the fabric around the air pocket to the surface to insure adhesion. This is an important aspect of successfully applying the fabric to the panel as air pockets will prohibit proper adhesion of the gilding to the wood surface.

An alternatice to fabric is a thin Japanese Paper one being Sekishu which I’ve used effectively over the mitres of picture frames when water gilding as the mitre can cause the gesso to crack through the expansion and contraction of the wood. This is also an effective technique used as times in gold leaf restoration.

Historically, the use of fabric between the sized surface and the gesso has also been used on metal before gilding. There is some evidence of this from early Egyptian gilding although it's a method most suitable to porous wood. The fabric will help the gesso to adhere to a non-porous surface but it will likely not be as long lasting as when done on wood.

Gesso For Traditional Water Gilding

Traditional Gesso is the combination of a protein binder (Rabbit Skin Glue, or simply RSG), distilled water, and either Calcium Sulphate or Calcium Carbonate - also known as whiting, or chalk - as a filler or bulking agent. It is not to be confused with the acrylic or oil-based gessos for canvases.

The traditional gesso recipe used in water gilding performs two functions: filling the grain of the wood and providing a smooth, hard surface that allows water gilded gold leaf to be burnished to a brilliant lustre, assisted by the soft cushion of clay bole applied to the prepared gesso.

The preparation of all of the recipes I use in water gilding are quite precise including that used to make gesso. One very important consideration is the strength of the RSG formula which is a 10% solution: 9 parts water to 1 part dry RSG, either in pebble or granular form. If the RSG solution is prepared too strong there is risk in developing crack mechanisms in the gesso layer. Likewise, if the RSG solution is too weak, one faces the possibility of delamination of gesso from the wood substrate.

Numerous layers of warm gesso are hand-applied or sprayed onto the wood surface. Each layer is allowed to dry only long enough so the application of the next layer does not disturb the previous layer. Anywhere from 5-20 coats may be applied, depending in part upon the object and the desired effect. The intent, which dates back to the early Egyptians, is that the wood appear as solid gold, an effect created largely by the use of gesso as a ground for gilding.

There are a variety of approaches used throughout the world in the successful preparation of gesso and although recipes and methods may seem at first glance to differ, the basic principles of glue strength and the ratios of RSG to Whiting are quite similar when analyzed. Logically, they would ultimately need to be since the relationship between the binder and the particles of calcium carbonate are subject to the same physical principles.

As an overview of preparing traditional gesso, its function is in filling the grain of wood and allowing the gold leaf to be burnished. It is also of great importance to understand the relationship between the strength of the binder (usually RSG - rabbit skin glue) and its relationship to the filler (whiting - calcium carbonate, or calcium sulphate). If the glue strength goes much beyond the 10% solution, the possibility of crack mechanisms in the gesso increases; likewise, if the glue strength is too weak, gesso delamination from the wood surface could occur.

This two-part Hard and Soft gesso recipe may be found among other gilding recipes for Download on the Class Materials and Recipes page of the gildingstudio.com website.

Applying Gesso

A raw wood surface is first coated with a thin coat of very warm 10% rabbit skin glue over all exposed areas to seal the surface and provide a foundation for the following coats of gesso. The Sized wood is allowed to dry for at least 24 hours which also allows the wood to return to a state of equilibrium. Gilded Panels are also given the extra treatment of a layer of thin linen or silk applied to the top surface during this initial Sizing stage which helps guard against crack mechanisms appearing in the gesso.

Once the proper gesso mixture has been prepared a sufficient number of coats are applied which in my own Practice is generally 14 coats - 4 Hard and 10 Soft. This is my general approach for flat surfaces such as panels and objects of moderate detail including frames, furniture, and architectural elements. The gessoed object is then allowed to sit overnight to thoroughly dry before further surface treatment.

There are different ways to smooth gesso, the most common today being sanding. I like using 3M Tri-M-Ite sandpaper as it holds up well and cuts through the gesso efficiently (I do not find Garnet Paper to be very effective in sanding gesso as it clogs the paper too easily). Primarily, I use either 220 or 320 grit, depending on the surface and how aggressive the sanding needs to be. As a rule of thumb I recommend using as fine a grit as possible while still being able to efficiently sand the surface. If the finer 320 grit works well there is no need to use the heavier coarse 220 grit which will leave heavier sand marks than the 320.. If 220 is used, follow-up with a sanding of 320 grit and a final sanding with 600 grit wet or dry paper used dry. The 320 amd 600 grits help to progressively remove or minimize any previous sandmarks. This is very important as these marks will telegraph-through to the layer of gold leaf which accentuates any imperfections in the gesso or subsequent layers of clay bole which is applied after the gesso has been sanded.

There are other techniques that may be used to smooth gesso. Cennino Cennini discusses in his 15th century treatise Il Libro dell'Arte (The Craftsman's Handbook) the use of 'little hooks' and a spatula to scrape gesso smooth as well as the use of water polishing with a damp rag. A method called re-cutting (reparure) prevalent during 17th century France and Italy, is still used today.

Punchwork And Other Gesso Treatments

Other treatments to gesso for aesthetic affect include Incising and Punchwork known as Granito which creates texture and often elaborate surface decoration as a compliment to the gilded surface. Another technique known as Sgraffito involves applying a traditional egg tempera paint over the burnished gold leaf followed by intricate etching of designs through the tempera paint to reveal the brilliant gold leaf ground. These two methods can also be combined where the revealed gold through the egg tempera is also delicately punched with metal tools or as I prefer, blunt pointed agate burnishers catching the reflection of light in a magical way.

Gesso Fridays Online

Traditional Gesso provides the foundation for Traditional Water Gilding. It fills the grain of wood, the intention of the ancient Egyptians to make an object appear as solid gold once gilded. It works with the subsequent layers of Clay Bole to allow the gold leaf to be brilliantly burnished.

This form of gesso is sandable allowing for an extremely smooth surface which makes it a wonderful surface for both traditional water gilding and mordant gilding, whether using oil size or water-based acrylic emulsion. As mordant gilding can’t be burnished with an agate stone as it is with traditional water gilding it therefore doesn’t require as many coats of gesso with six coats usually being sufficient to fill the wood grain.

Traditional Gesso is also useful for the egg tempera painter, Iconographer, as well as those working in oils or acrylics where a smooth absorbent ground is desired on a wood panel.

Although gesso is always a part of the long form Courses which I teach for Water Gilding and Gold Leaf Restoration I felt it would be beneficial for students to have an Online gathering place where they can simply come to learn how to make gesso. Gesso Fridays is easily accessible with an Online Weekly 90-minute class that is both Live and Recorded and includes a Question and Answer period during each Friday session. Since Gesso Fridays repeats each week it gives students flexibility to choose any Friday of the month to attend (except when the Online class is closed for holidays or to make room for the occasional trip for the in-person classes!). As an added benefit the recordings of the Live classes remain viewable by students for six months.

Gesso Fridays is suitable for gilders and Fine artists, both beginners and experienced whether this is a first-time experience in making traditional gesso or to gain new insight and perspective in its working properties. Gesso is a material that is fairly simple in its combination of just a few materials but still requires great care in its preparation which is what this class is all about. And with the frequency of a once-a-week class, if a student can’t quite make Sign Up today, there’s always tomorrow…

A Few More Notes

To explore preparing gesso and these various traditional gilding techniques offered both Online and in-person visit the Gilding Class Information page for more detail or go to the Book A Gilding Class page for an-up-to date class schedule and Registration. To Register for a Gesso Friday Class Visit the Gesso Fridays Online Sign Up Page to select your Friday of choice!

For this excellent Gesso Recipe for frames, furniture, plaster sculptures, gilded architectural elements, or for Fine artists who wish to Gesso Panels for their own works of art, visit the Recipes Section of this website and scroll down to the Traditional Water Gilding class and download the water gilding recipe .


Mecklenburg, Marion F. 1991. "Some Mechanical and Physical Properties of Gilding Gesso." in Gilded Wood Conservation and History, edited by Bigelow, D., Cornu, E., Landrey, G. J., and van Horne, C., 163–170. Madison, CT: Sound View Press

Gilding In Owen Sound
In Person Gilding Classes In Owen Sound, Ontario May 3-7, 2023

Ontario

Gilding Classes

Gold Leaf Restoration Gilding For Fine Artists Glass Gilding/Églomisé

A Much Anticipated Return To Ontario

Each of the towns and cities where I have taught gilding have their own flavor and specialness from meandering the bookshops of San Francisco to the flavorful Indian Restaurants in Louisville, Kentucky where along the rural countryside there’s a landscape of grasslands and horses and always wonderful people and students in each place. Two locations, however, stand out for personal reasons - New York City and Owen Sound, Ontario.

These two areas, one among the most bustling cities in the world and the other, a comfortably quaint village are in most ways worlds apart. But for me, New York in the end is home, born and raised and where I began my long gilding career in my early years as a member of the Visual Merchandising Department at Saks Fifth Avenue forty years ago before moving to the Pacific Northwest in 1988. So my visits allow me to both visit the city and people while teaching students who come from down the block, all over the United States, and as far away as Hong Kong, The Philippines, and South Africa.

On the other end is Owen Sound, this quintessential small Town at the northernmost part of Ontario, Canada. It was in Tara, a small Village in Owen Sound where my maternal grandfather came from and who I was named after. My grandfather also did some gilding and had worked on both the original Roxy Theatre and Radio City Music Hall in the 1930’s in New York. The odd thing is that I never knew this until I had already been gilding for 17 years when I learned this bit of family history.

The other meaningful coincidence here is that I would eventually meet an Art Conservator, Amber Harwood whose business Georgian Bay Conservation is located in Owen Sound. As life would have it, Amber invited me to teach at her studio which I did in 2019. As small as the area is, the classes sold out. It was such a wonderful experience for us all that we decided to do it again. And then the Pandemic hit.

Two and a half years later we have now set the return date to beautiful Ontario and looking forward to meeting all of you who can make it for the first week of May, 2023!

Class Summary

What we have in store are three separate gilding classes:

  • An Introduction to Gold Leaf Restoration focuses on Traditional Water Gilding and Mould Casting for Ornament repair.

    Students will learn a simple technique of creating a non-toxic silicone mould and a cast in hydrocal for ornament replacement. Students take part in exercises to become acquainted with traditional water gilding, gesso and clay bole preparation, handling genuine 23k gold leaf, essential toning techniques, and blending newly laid gold leaf into an existing gilded Finish. Also Included in this informative 3 day Intensive on gilding restoration is a demomstration of a simple approach to gilding picture frame mat beveled edges as a complement to gilded frames.

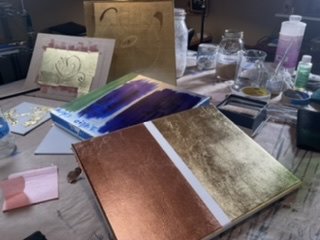
  • Gilding for Works of Art is a one day Study for Fine Artists designed to meet the needs of the artist who is looking for ways to incorporate gilding into their own works of art on canvas, paper, and panels. Students learn to lay a gold ground in both Aluminum Leaf for a bright silver colored appearance and genuine 23k gold leaf using a water-based acrylic emulsion as a mordant. Application of MSA varnish is demonstrated as a protective layer as well as GAC as an isolation coat for acrylics with suggestions on oils.

    Other ancient and contemporary mordants inluding glair, gum ammoniac, garlic juice, urushi lacquer, Kölner Instacoll and Miniatum Ink are also discussed with hands-on exploration of a selection of these uniquely interesting adhesives for gold leaf.

  • Glass Gilding: An Introduction to Verre Églomisé is a one day Course of Study where students learn to properly prepare the glass for gilding, prepare a gelatin in water size (adhesive), and gild the back of the glass in 6k white gold leaf. When dry, a design is etched with a bamboo stick through the now bright white gold leaf and backed up with enamel paint which can then be viewed from the front of the glass.

    This method, known as glass gilding or reverse glass gilding, is the technique used in the art of Verre Églomisé. (For further reading on this beautiful artform read the Post on Verre Églomisé which will take you deeper into the origins of this ancient method from the Early Romans).

Class Dates Confirmed for Owen Sound: May 3-7, 2023!

Dates for the Return to Owen Sound Gilding Classes are now confirmed for May 3-7, 2023. Registration is now available on the Book A Class Registration Page or follow these individual Links:

Register early as some seats are already registered for and there is strong interest in the classes. Students come from a variety of places, from Vancouver and the US to Nova Scotia and Toronto. All are Welcome and Open to all levels (Materials Included in Tuition) .

While waiting feel free to pop over to the Gilding Class and Information Page where you’ll find more about the evolution of the various gilding classes offered.

See you in Owen Sound!

Gilding For Absolute Beginners
Gilding For Absolute Beginners Online Gilding Class

Let’s Begin!

We All Need To Start Somewhere…

Sometimes when we begin something new we’ll wonder to ourselves ‘where do I begin?’. As I was considering this about the students I speak with who are interested in learning but have little idea how to begin I decided that I would create a gilding class where we start off from the absolute beginning which finally lead to this new class, taking its place among more advanced studies in traditional water gilding, verre églomisé, and the discovery of ancient mordants.

While planning this out I saw that the class would need to begin from a point of ease, where handling the materials can introduce the student to the art of gilding without it being overly challenging, and using a contemporary mordant, or adhesive, that is water-based and therefore easy to cleanup. This provided the framework to structure the class - a short course of study, once a week for four sessions, designed for students who have little to no gilding experience and who can feel comfortable knowing that their class will be filled with like-minded classmates, a class ‘…for Absolute Beginners’!

We Start With An Easy Water-Based Adhesive

The added benefit of working with a water-based mordant is that it’s an acrylic emulsion which means that although it cleans up with soap and water it eventually becomes permanent. It also has other working characteristics which are proving to be very beneficial in modern gilding such as extraordinary flexibility making it a good option for use on canvas for painters as well as on leather and just about any non-porous or semi-porous material. It’s also an excellent mordant for the new student due to it’s quick ability to come to tack in about 10-15 minutes while remaining in the tacky stage, or open, for many hours (actually I have found it to be many days!). So this removes the stress to move quickly leaving students to focus on learning to handle the leaf.

Which brings us to…the leaf. I’m a big believer that if you wish to learn to gild with genuine gold leaf then you should begin straightaway because the heavier feel of the Base metals we also gild with - brass and aluminum - are not nearly as thin and malleable as genuine gold leaf and could even make it more difficult to learn to handle gold leaf because of a sense of feel between the precious and non-precious metals, almost similar to muscle memory.

From Brass Leaf…To Gold!

However, this said, I think it’s useful for the beginning student to first become acquainted with the concept of gilding by initially working with the non-precious metals, focusing on how to create a non-porous surface to gild upon when using the mordant method of gilding, watching how leaf behaves with a tacky mordant, the drying of the mordant size, the required tack before laying the leaf, and smoothing the gilding in the end. These are all concepts which the student needs to learn and therefore may be better served without the added difficulty of learning how to handle the much thinner 23k gold leaf.

These Base metals include two forms: Brass Leaf which is sold as and referred to by different names including Imitation Gold, Composition Gold, Dutch Metal, Gold Metal Leaf; and Aluminum which is referred to as Imitation Silver and Silver Metal Leaf.

The Methods Of Gilding

There are two methods of gilding wood: Water Gilding and Mordant Gilding and these are the two methods we focus on during the Absolute Beginner class with the greater emphasis on Mordant gilding. Mordant is the term used in gilding that represents a Size or Adhesive which can be either aqueous in nature or Oil- Based. The aqueous sizes include such ancient vegetal mordants as garlic juice (Ilinocopia), fig juice, gum ammoniac, gum arabic or any number of the contemporary acrylic sizes such as the acrylic emulsion sold as water-based adhesive from Sepp Leaf Workshop, Dux, and other brands such as Mona Lisa and Wunda Size. Other acrylic mediums include the various selections from Kölner including Miniatum, Miniatum Ink, and Instacoll. The oil-based mordants are oil varnishes which are categorized as either Quick Size or Slow Dry Oil Size which relate to how fast they come to Tack and how long they remain Open which means how long the oil size remains tacky enough to be gilded.

Water gilding is a complex process which involves preparing a rabbit skin glue (RSG) solution, gesso which is made with RSG, calcium carbonate or calcium sulphate, and water, and the preparation of Clay Bole which is a creamy clay mixed with either RSG or Gelatin and applied over the gesso.

Traditional Water Gilding requires an absorbent porous surface and produces a beautiful Finish which glows brightly when burnished with an agate stone burnisher. For a more detailed description of the process readers will enjoy the Blog on this ancient method of gilding in the Post Traditional Water Gilding for Panels…From Pastiglia to Sgraffito.

Our Focus On Mordant Gilding

Unlike Water Gilding, Mordant Gilding requires a non-porous or semi-non-porous surface depending upon whether the mordant used is aquaous or oil-based. Oil Size requires a completely non-porous surface so that the oil will sit on top of the surface to be gilded, otherwise if the surface is absorbent the oil will seep into the surface leaving insufficient size remaining for the leaf to adhere to the object being gilded. Aqueous Mordants such as glair (beaten egg white) or gum ammoniac are often applied over paper that has been weakly sized and therefore will be absorbed slowly into the paper but also allowing the leaf to bond to the surface. These aqueous mordants, however, can also be applied to non-porous glass successfully. Ceninno Ceninni spoke of the use of glair for glass in Il Libro dell’Arte, the 14th c treatise on painting and gilding.

The Online class Gilding For Absolute Beginners is a four-week program where students meet once a week on Zoom for approximately 90 minutes. All sessions are also recorded and students have full access to the recordings for six months after the series ends. There is also a Question and Answer period during each lesson.

Porous And Non-Porous Surfaces

Students are first guided through the concept of porous and non-porous surfaces and how to make a porous surface non-porous, meaning non-absorbent so that the mordant will not be absorbed into the surface. A brick is often a good example for demonstrating this procedure due to the high-porosity of this building material. (I once oil gilded an entire brick fireplace in 24kt gold leaf for an architect client, a good example for turning the ordinary into something unique!)

One simple way of making a porous object non-porous is by simply applying shellac, a topcoat often used in woodworking but used quite frequently in American gilding as a protective topcoat. Coatings of this nature are often not used traditionally in other countries such as Italy and France as any topcoat will dim the brilliancy of the gold leaf. American traditions in gilding seem more accepting of this, an approach which I personally enjoy due especially to its warming capability of bright water gilded gold leaf. For the purpose of sealing a surface, shellac is an excellent vehicle as a method for preparing a surface to make it non-porous.

Paint As An Undercoat For Gilding

Students are also guided in the understanding of the importance of a color under the metal leaf, whether gold, silver, brass, or aluminum. The thinner the leaf the greater the tendency that the undercoat color will inform the overall tonality of the leaf. Genuine gold leaf, white gold, and silver are the most affected by color undercoats due to the thinness of the leaf, especially of the gold which is somewhat transparent. But even this thin gold leaf will allow an object to appear as solid gold once properly gilded.

To seal a surface and also empart a color ground for gilding, an acrylic or oil-based paint are successful undercoats and are therefore a better choice than clear shellac since paints will also provide color and will give a little smoother surface as a ground for the leaf.

The conversation of surface preparation continues because even though the basic requirement for proper mordant gilding is creating a non-porous surface there is still the question of whether the existing texture of the sealed surface is sufficient for creating beautiful gilding. This is where we reach the point of craft versus art, the craft represented by making the surface non-absorbent (i.e. shellac, paint undercoat) versus how the gilding looks in the end.

A non-porous surface does not necessarily make the gilding look its best, it simply allows the gilding to take place: the surface is made non-absorbent, the mordant size is applied to the sealed surface, and the leaf is applied once the mordant reaches the proper tack. If a tarnishable metal leaf was used then it will need to be given a topcoat of shellac or varnish for protection but it can then be considered complete. But is it enough? Does the gilding appear the way we envision it?

The Cause For Gesso

This leads the class to the benefits of gesso, which in traditional gilding involves rabbit skin glue, water, and most often calcium carbonate. Its use on wood is intended to fill the grain so the gilded object appears as solid gold, a concept that goes all the way back to the Early Egyptians. It is up to the student artist to decide whether gesso is necessary or even desired as there are cases where a textured surface may be preferred and therefore an artistic decision is needed.

Traditional gesso is optional when working with the mordant gilding method but it can impart a very smooth surface for gilding and is very useful for picture frames, furniture, and architectural elements gilded in this way. It is most often used for Traditional Water Gilding, however, as it is necessary to help produce a brilliant shine in the gold or silver leaf, working in tandem with the cushioning effect of the clay bole that is applied to the sanded gesso as the final undercoat of the gilding.

The recipe for making traditional gesso is discussed with the students of the Absolute Beginner’s class and is made available for further self-study. A Masterclass in the preparation of traditional gesso is available generally twice a year as part of the gilding program at Charles Douglas Gilding Studio.

Handling Genuine Gold Leaf

One of the major areas of study during the Gilding for Absolute Beginner’s class is the study of handling genuine 23k loose Gold Leaf. This high karat leaf from Manetti in Florence, Italy is chosen for the class. The term loose is used to differentiate it from the Patent form of gold leaf which is lightly adhered to a backing paper with a light wax coating. Students are shown in class how to use the loose form of gold leaf as it’s more flexible in how it can be used, whether on flat surfaces or in the tiniest crevices of the detailed architecture often found on frames, furniture, or intricate carvings where Patent leaf would be inappropriate due to the presence of the backing paper.

It is an important aspect in each of the gilding courses that students learn to use the gilder’s tools: the gilder’s pad, knife, and ‘tip’ - the thin squirrel or sable-haired  brush used by the gilder to pick up the gold or silver leaf from the pad and place it on the object being gilded.

Topcoats And Antiquing

The final topic covered in the Gilding for Absolute Beginners class is applying the shellac topcoat as a protective layer to the gilding and creating a simple patina to the gilding to create an aged or antiqued appearance. The patina is created by preparing a wash made by adding water to a non-toxic raw umber casein paint. The paint is thinned and brushed on to the gilded surface. Once dry, the removable casein is then buffed by hand to reveal a little of the underlying brilliancy of the leaf and re-sealed with clear shellac. Once the shellac is dry the overall gilded object is buffed with cheesecloth dabbed with rottenstone, a very fine polishing powder which cuts the glossy appearance of the shellac and pulls the look of the finished gilding together. Sometimes a little of the rottenstone is left behind in some of the crevices if the object is ornate, offering the appearance of natural accumulation of dust; otherwise, it can be dusted off completely for a cleaner look.

A student can produce many objects of varied beauty and creativity working within this realm of mordant gilding. For the purpose of growth as a gilder and for providing more creative options, a further course of study in Traditional Water Gilding would be a natural next step, taking the complexity of gilding further…one step at a time. ~

For further information on the gilding classes offered go to the page Gilding Class Schedule and Information or visit the Book A Class page to sign up for a class!

Gilding For Works Of Art…A Study For Fine Artists

It’s been over twenty years now since I started working on the idea of a gilding class specifically for Fine artists for works of art on canvas, panels, and paper. It was in response directly from artists who are always looking for innovative ways of incorporating gold, silver, and other metal leafs into their art.

The use of gilding for works of art has an extensive, beautiful, sometimes tumultuous history. We are informed by 4thc Byzantine Icons after the Early Roman Empire to the 16thc influence of European tradition on the Cusco School of painting in Peru following Spanish conquest, some of the paintings I was fortunate to see during the exhibit: Peru: Kingdoms of the Sun and Moon at the Seattle Art Museum in 2013. There is the long tradition of Florentine gilded and egg tempera panel paintings from 13th to 18thc Firenze as seen at the Uffizi Gallery. have the work of Gustav Klimt, the 19thc Austrian Symbolist  who during his ten year Golden Period created some of his most well-known artworks where he made prolific use of gilding including The Kiss, Beethoven Frieze, and Portrait of Adele Bloch-Bauer I which hangs on permanent display at the Neue Galerie in New York which I often visit on my trips when I teach in New York, informing my own gilding sensibilities whenever I take time to study her. Many of Klimt’s Works may be seen in the Klimt Collection at the Belvedere in Vienna.

 Contemporary Gilded Paintings

Some of my earliest students brought to my attention the works of contemporary artists Brad Kunkle and Fred Wessel, who over the years have become friends and colleagues. Their work is singular with Brad’s ethereal paintings in oil using the mordant gilding method providing a subtle but dramatic ground for the dreamlike quality of his figurative paintings while Fred’s exquisite Egg Tempera Panel Paintings makes extensive use of Traditional Water Gilding, reminiscent of the early Mosaics of Ravenna with jewels embedded in the gesso surrounded with Granito - punchwork and incision which adds dimension to the water gilded surface.

Gilding for Works of Art Classes: New York

There are two versions of my Gilding for Works of Art…A Study For Fine Artists - In Person and Online - which continues to evolve to meet the needs of the artist student. The In-person class is currently a one day Intensive offered primarily in New York at both Sepp Leaf Products in Lower Manhattan and at the Isabel O’Neil Studio on the Upper Eastside where I hold weekend classes under special arrangement 2-3 times a year.

People learn in different ways and so the two different formats are appealing in different ways as well. Working with students in-person allows close interaction where I can monitor how a student approaches the technical aspects of gilding - handling the gold leaf, applying the oil size or water based adhesive, smoothing the gessoed panel by hand. I can help personally guide the atudent for quick corrections and suggestions. And there is a social interaction between students which I always find wonderful, watching a shared purpose foster new friendships that carry into the future.

Gilding for Works of Art Classes: Online on Zoom

The Online format on Zoom offers a different type of benefit: we get to slow down. And that can be helpful as we take each step of a particular method and break it down to a lesson a week such as creating a golden ground with a mordant suitable for canvas and 23k gold leaf.

The structure of the class is divided into increments keeping the learning process from becoming overwhelming while remaining challenging. During each weekly session which can run from anywhere from a single 90 minute Masterclass to a full 12 week program we have a 30 minute Question and Answer period where students and I can discuss any question that comes up related to the topic.

These Live Online classes are also Recorded for students to review up to 6 months after the series ends as often as they like. This is especially helpful for students in different timezones or if someone need to miss a class. Sometimes students will choose the option of simply watching the recorded version of the Live class which includes listening to the Question/Answer periods. And amazingly, I still notice how friendships continue to be built, sharing stories, successes, concerns, from Sweden to San Francisco!

What Students Learn in Gilding For Works Of Art

One of my ultimate goals in this class is to teach students how to apply gold leaf to canvas. We begin both the In-Person and Online series using water-based adhesive (acrylic emulsion) on a prepared acrylic-gessoed canvas board which we gild with either brass or aluminum leaf, often referred to as imitation gold or silver leaf. This provides a gilded ground to first coat with an MSA varnish to protect the leaf and GAC 200 and 500 as an isolating coat to protect the removeable varnish. The ground is then ready for painting in either acrylics or oil of which the differences, alternatives, and caveats are discussed.

We then progress to using 23k gold leaf with an emphasis on how to handle loose gold leaf by placing it on the gilder’s pad, cutting it with the special gilder’s knife, and picking it up with the Gilder’s ‘Tip’, the thin, long Sable or Squirrel-haired brush used specifically for picking up gold leaf with the aid of natural skin or hair oil rubbed along the hairs. The gold is then applied to the prepared canvas, gently tamped with a soft hand-made pad or soft brush and left to dry.

Throughout the gilding class and online program we explore the use of both contemporary acrylic mordants including the Sepp Leaf Workshop brand of Water Based Adhesive/acrylic emulsion, and Kölner’s Instacoll and Miniatum Ink which can be used on objects from wood and leather to glass and paper. Students also experience the historical preparations and use of ancient mordants through demonstration as we work with gum ammoniac and glair (beaten egg white).

Alongside these demonstrations of applyying gold leaf to canvas as well as panel boards and paper I like to show how these mordants can be used freehand on a surface or combined with Rubber Stamping and Linocuts on cold pressed watercolor paper.

Kolcaustico Venetian Plaster

Adding texture to canvas, panels, or walls as a form of expression can add complexity to a gilded surface. Sand has historically been added to traditional gesso to provide contrast on water gilded frames. Raised gesso, sometimes referred to as Pastiglia is a technique where a design is drawn by hand in gesso on frames and furniture as well as on paper and vellum in manuscript illumination.

The technique of using Venetian Plaster has a very long and beautiful tradition for decorative interior walls. With advances in acrylic mediums it would only be a matter of time before it joined the field of Venetian Plasters as a contemporary option for decorative plastering.

Kolcaustico is a modern acrylic version of traditional Venetian Plaster which I have been incorporating in the class Gilding for Works of Art for artists seeking alternative ways to introduce raised textures in their paintings on canvas and panels. Kolcaustico flows on in a smooth fashion when applied with a spatula and can be built-up fairly quickly and left to dry. This acrylic plaster as a ground for gilding dries quite hard which allows for a nice brilliancy in mordant gilded leaf. It can be gilded with either an acrylic emulsion water-based adhesive such as The Sepp Leaf Workshop or Dux brands or oil gilded with quick or slow dry oil size.

Kolcaustico can also be tinted by 10% with Mixol, a universal tint which provides a color under the leaf and eliminates the need to paint a topcoat over the raised plaster before gilding. An undercoat of color is often used when gilding as it affects the overall tonality of leaf, especially the thin genuine gold leaf.

One word of caution is that Kolcaustico is intended for use on a stable surface such as walls or panels. However, it bonds well to acrylic gesso thats been primed on canvas although small stress cracks in the plaster can appear due to the flexibility of the canvas. This affect could be considered bothersome or attractive depending on the artist’s intention although I have found that Kolcaustico remains stable on canvas while these small stress cracks tend to blend into the background once gilded. Regardless, it’s always a good idea to test any new material that you haven’t tried before on a sample surface first before moving forward with a project.

Gilding Class Registration

Find out more about the gilding class program on the Gilding Class Information page. To sign up now for an Online or In-Person class please visit the Book a Class page. You’ll be contacted within 24 hours with an official confirmation of your Registration. See you in Class!

Water Gilding

Traditional Water Gilding

Traditional Water Gilding is the oldest of all the gilding methods, with the origins of gilding dating back over 4,000 years ago to Northern Africa. The sheets of what we think of today as gold leaf were in its earliest form more of a thick foil which would be pinned to an object for ornamentation, often with Spiritual significance.

Very little has changed over the years throughout the history of Traditional Water Gilding. A surface foundation we call gesso today is still comprised of an animal-based glue and filler - rabbit skin glue and calcium carbonate or calcium sulphate - with a clay mixed with the glue and applied for color over the white gesso informing the tonality of this thin metal while also providing a cushion underneath the gold to aid in its burnishing. Today we usually use agate stones in various shapes for burnishing gold and silver leaf which makes the leaf shine and compresses it into the surface making it more durable in its bond to the surface. Historically, however, a dog’s tooth was used for burnishing as described by Cennini in his late 14th Treatise Il Libro dell’Arte - The Craftsman’s Handbook. Two translations are available, the earliest by Daniel Thompson (1954 is the first Publication by Dover) with the newest (2015) by Lara Broecke. There are other earlier translations of this intriguing writing of Cennino d’Andrea Cennini with each new translation correcting the previous.

One aspect of gilding that has changed throughout its history is the thickness of gold leaf due to the malleable characteristic of gold to be beaten thin, most notably with the progressive use of machinery taking the place of hand hammering, although still used to some degree by the goldbeaters. I was very fortunate to witness this ancient craft of gold beating when I visited the Manetti Gold Beating Factory in Florence where I watched as ribbons of gold were beaten and ultimately cut into 3 3/8 inch squares and packaged for delivery. A wonderful experience to be detailed in another story for another day.

Water Gilded Panels Class…Pastiglia to Sgraffito

The method of traditional water gilding can be seen on 13th and 14thc Florentine egg tempera panel paintings, a period which can be viewed as a point of reference for the online gilding class Traditional Water Gilded Panels…From Pastiglia to Sgraffito. Of all the gilding classes offered through Charles Douglas Gilding Studio this is the most extensive, meeting weekly for 12 weeks in includes the embellishment techniques of Granito, Pastiglia, and Sgraffito.

To grasp a full understanding of Traditional Water Gilded Panels students are taken through each step of this ancient method which include the following steps:

  • Chamfering the panel’s edges

  • Preparing the 10% Rabbit Skin Glue Size

  • Sizing the Panel

  • Applying and glueing Fabric to the Panel

  • Preparing and applying Hard and Soft Gesso

  • Sanding the Gesso

  • Preparing and Applying Clay Bole

  • Gilding in 23k Gold Leaf

  • Burnishing

  • Granito

Gilding Recipes For Gesso and Clay Bole

The recipes for the Rabbit Skin Glue (RSG) Size, Hard and Soft Gesso, and Clay Bole can be downloaded at the Charles Douglas Gilding Studio website under the Materials and Recipes Tab in the Navigation Bar. Students are shown in the online class how to properly prepare all of the materials and the panel for gilding in genuine 23k gold leaf. The gesso recipe was passed onto me many years ago based on an old English approach and later presented to be the best for its stability in a paper Titled Physical Properties of Gilding Gesso by Marion F. Meklenburg from the book Gilded Wood Conservation and History, edited by Deborah Bigelow who I was fortunate to have taken a class with in 1998 on the concept of Toning Gilding which was around the same time as the publication of what remains my favorite reference books on gilding.

During the Water Gilded Panels class students gain an understanding of the principles of how the system of Traditional Water Gilding works for stability of the gilding on wood, adhesion of gold leaf to the clay bole, how the gold leaf is burnished, and how the various decorative embellishments of granito, pastiglia, and sgraffito are performed.

Handling Gold Leaf

Perhaps the most challenging aspect of learning to water gild is the handling of the extremely thin gold leaf which can measure as thin as 1/250,000th of an inch (less than the width of a human hair). Despite the extreme delicate nature of this beautiful and malleable of all metals it can be managed and tamed and with time and correct practice students can become adept at handling gold leaf

Students are shown how to use the gilder’s main tools - the pad, knife, and ‘tip’, the thin-haired sable or squirrel hair brush used to pick up the gold leaf from the gilder’s pad where the leaf was cut with the gilder’s knife to the desired size off gold leaf with the knife. I also demonstrate cutting small pieces of leaf as tiny as 1mm for spot gilding, the practice of applying small pieces of leaf to spots where the gold may have been missed, generally from either a small air bubble or breakage in the gold.

Gold leaf is subject to various conditions which can be difficult to contend with especially for the beginner - static electricity in the room and on the pad or knife, knicks in the knife, insufficient skin or hair oil which is used to pick up the gold leaf (no, we don’t want static for this, no matter what you read elsewhere!), and often, that slight breeze from someone walking by that blows your leaf right off the table! But in time you’ll learn how to handle each of these situations and I personally guide you in each class that’s offered through demonstrations and discussion due to its importance.

Gilding The Panel

Each session for the online class Traditional Water Gilded Panels…From Pastiglia to Sgraffito involves 12 weeks of Study where students gather with me online weekly for 90 minutes. The first hour is dedicated to a specific step in the water gilding process for Panels with the remaining 30 minutes allowed for a Question and Answer period with the students, a dynamic aspect of the online classes where we can explore student’s questions in depth.

The preparation of the 12” x 12” Panel takes the first five lessons, from preparing the Size and Gesso to applying the five layers of silky smooth Clay Bole. We are then ready to begin gilding.

Both Single and Double Gilding are demonstrated in class where Double Gilding is simply applying a second layer of gold leaf over the first which provides for an absolutely fully covered layer of gold over the gessoed panel. The main objective of Double Gilding is to cover any areas where the initial single layer of gold leaf may have small holes from air bubbles, breaks in the leaf where the overall appearance of the gilding would be more uniform in its beauty by Double Gilding rather than simple spot gilding which can sometimes leave ghost images from general touch-ups.

A student’s gilding will become more proficient with time and better leaf-laying skills will leave fewer imperfections but there is sometimes the occasional mishap in water gilding where a second application of gold leaf can provide an overall more attractive appearance. These concepts of spot gilding, single gilding, and double gilding are all discussed and demonstrated during lessons 6-8 where the class is focused on laying gold leaf to the panel.

Burnishing, Granito, Pastiglia, Egg Tempera Sgraffito

…To Be Continued!

Verre Églomisé

Gilded Glass

Laying The Gilded Foundation For Verre Églomisé

Gilding, the application of an extraordinarily thin layer of metal known as leaf to another surface for ornamentation feels at times as having infinite possibilities in its methods and techniques, some new, most quite old with its roots reaching back several thousands of years.

The gilding of glass combined with painting was practiced during Early Roman times, an artform brought back in vogue by 18th c French Designer and Framemaker Jean-Baptiste Glomy. It appears that Glomy practiced a specific type of painting and gilding specifically for framing prints whereby the reverse of the glass displayed a gilded border and colored paint. When others followed afterwards certain techniques similar in nature became known as églomisées as discussed in the book (1) Journal of Glass Studies. Terminology of Verre Églomisé by Rudy Eswarin, published by Corning Museum of Glass. This excellent scholarly study on the origins of the term Verre Églomisé can be found on the Digital Library website of JTSOR.

Glass Gilding: An Introduction to Verre Églomisé

The intent of both the Online and In-Person class offered by Charles Douglas Gilding Studio, Glass Gilding: An  Introduction to Verre Églomisé, is to help students in their understanding of the essential requirements for gilding glass while learning some of the techniques used in Verre Églomisé work such as etching through the gold or silver leaf with a pointed bamboo stick. Learning the key elements for producing a successful gild, however, is necessary:

  • proper cleaning of the glass to remove any silicone or contaminants that might interfere with adhesion

  • Careful preparation of the gelatin Size, the aqueous adhesive used to adhere the gold or silver leaf o the glass

  • A good balance between brilliancy in the gilding and a good bond between the leaf and the glass

Typically, the class begins with a general overview of the topic of Verre Églomisé and glass gilding followed by preparing the size, cleaning the glass, and laying 6k white gold leaf to the back of the glass. During the in-person class this is when we break for lunch, allowing time for the leaf to dry (while continuing our discussions together over lunch at one of the local New York cafés or restaurants!).

Once we return to the studio we then buff the gilding if dry (or hasten it if necessary with a hair dryer) removing any little pieces of overlapped leaf and gently burnish the white gold with soft cotton. From here we explore the various steps we take depending on how we want the gold to look, either distressed, solid, or etched. We learn to spot gild by applying small pieces of white gold to areas we may have missed or where adhesion was insufficient which also gives students practice in learning how to cut leaf on the gilder’s pad.

Students discover how to double gild by simply applying another layer of leaf over the original layer which strengthens the solid character of the gilding while covering any small anomalies due to missed spots, pinholes, or cracks in the the leaf that can be covered more effectively by double-gilding rather than spot gilding which can leave behind faint ghost images made from the deposit of gelatin size.

We explore methods of abrading the gilding with handrubbing and pumice powder which gives and intriguing appearance when backpainted with oil-based paint showing the spiderweb-like veining in the leaf produced by the wrinkles created at times when the leaf is laid. A black paint is often nice for this dramatic effect although any color can be used.

Etching is produced by scratching through the leaf with the tip of the bamboo stick, creating a design in reverse either freehand or with the aid of a stencil or traced image for guidance. The image and the surrounding leaf gets backed-up with either a single or multi-colored application of oil-based paint which reads through on the front of the glass. The paint also seals the leaf offering a physical barrier against scratching as well as protection against oxidization of any tarnishable leaf that might be used including 22k gold leaf and less including genuine silver leaf. The backup paint also makes the gilding more reflective and solid since leaf, especially gold leaf, is somewhat transparent due to how thin it is beaten.

What Is Verre Églomisé Exactly?

The term Verre Églomisé has apparently drawn disagreement ever since its conception as to what it exactly refers to, whether the painting on the glass is strictly translucent or also opaque and whether it may be referred to as églomisé with or without the additional useage of gilding. Since Glomy’s time Museums and Institutions adopted the term to incorporate a wide variety of reverse painting, gilding, and engraving techniques which eventually would lead to the demand that the term be eradicated but to no avail. As quoted in the Journal of Glass Studies W.B. honey of the Victoria and Albert Museum wrote in 1933:

“The word was first adopted officially, so to speak, in a catalogue of the Musée de Cluny in 1852; when taken over by the Italians agglomizzalo it began to assume an air of respectable antiquity and became the customary term for all sorts of painting and gilding behind glass, of any date. Purists have denounced the term as an anachronism, as indeed it usually is, but in the absence of any other short name it is quite likely to survive.” (2)

Suffice it to say that the term has been a form of consternation for many scholars nearly since the beginning of its use while the term has evolved since the mid-eighteenth century to include all forms of gilding on glass. It would seem to have stepped away from its original intent although there doesn’t seem to be an agreement exactly on what that intent was. And so I think it’s safe to say that glass gilding is an excellent term to include all manners of gilding on glass while verre églomisé can accompany that world of reverse painting on glass with or without the use of engraved or etched gilding. ~

Another term that some glass gilders use for glass gilding is Water Gilding as it uses a weak gelatin Size made of gelatin dissolved in water to adhere the gold to the glass. However, I have a problem with using this term as there is already an ancient method of gilding wood such as frames, furniture, and architectural detail called Traditional Water Gilding, the earliest form of gilding and which also uses water throughout the process.

Exploring further into the terminology of gilding I would like to draw attention to Mordant Gilding, which is applying gold, silver, or other metal leafs to a prepared ground with a variety of water, oil, or vegetal-based adhesives. Some of these mordants are ancient such as gum ammoniac, garlic, or glair (beaten egg white); linseed-oil based oil size has been used for hundreds of years leading us to a growing contemporary selection of acrylics such as water-based adhesive (acrylic emulsion), Instacoll, Miniatum, and Miniatum Ink.

As gelatin used in glass gilding qualifies as a mordant perhaps glass gilding then is just another form of Mordant Gilding. Although that would only describe the gilded element of verre églomisé and not the painting or etching leaving us short once again in fully describing the beauty of this timeless artform. Perhaps we should just call it - magical! ~

An Experiment on the Electrical Properties of Gilded Glass

Dating back to 2009 I had a very singular and intriguing request concerning scientific research about the prospect of providing gilded glass to test its electrical properties. However, I didn’t know whether any of the traditional binders would interfere with the required electrical conductivity but accepted this opportunity to provide gilding of a large glassbeaker despite the unknown suitability of traditional glass gilding techniques.

The purpose of my client’s experiment was to repeat in the laboratory the process by which electricity produces lightning and to demonstrate that when water vapor condenses, the condensate is not neutral but negatively charged.

The Art And Science Of Glass Gilding

The first requirement was that the gold leaf be 24kt. I chose Manetti Double Weight purchased through Sepp Leaf Products in New York. Although gold leaf can be adhered with a variety of binders including oil size or glair (egg white), we chose gelatin dissolved in distilled water as used in verre églomisé. The rationale was that the residual binder remaining on the glass would be minimized with the small amount of gelatin used. I used four diamonds of gelatin to 300 ml distilled water.

The beaker needed to be gilded on the exterior including the bottom with a 1.5" distance from the edge of the gold leaf to the top edge of the glass. The gilding on the face of the beaker is the opposite of what is often referred to as Verre Églomisé which relates to Reverse Glass Gilding, the gilding of the back of glass as used in gilded mirrors and gilded glass tabletops. I simply taped off a section of the beaker 1.5" from the edge and gilded the glass upside down. For maximum coverage I double gilded the glass to allow for a solid covering of gold. After carefully packing the beaker with a layer of Saran Wrap and a multitude of cotton balls, bubble wrap, and packing peanuts, I sent the beaker on its way and waited to hear the results of my client’s project. Here is a brief description of his gilded glass experiment:

The electrical properties of the gilded beaker 24kt Gold Leaf on Glass: “An experiment of the electrical properties of gilded glass were better than expected. The gold surface is used to collect water condensate. Ice water is put inside the beaker to make the gold surface cold. Dew forms on the gold if there is enough humidity. This allows the investigator to demonstrate whether, when water vapor condenses, the condensate is neutral or negatively charged.”

It was fascinating that lightning was indeed produced during the experiment. As a gilder, another main finding of interest is that when electrical conductivity is required, gelatin in distilled water is a successful method of adhering gold leaf to glass. ~

Glass Gilding Classes

For those interested in studying gilding Charles Douglas Gilding Studio offers both In-Person and Online Classes including the popular : Glass Gilding: An Introduction to Verre Églomisé. Visit the website page Gilding Class Information for more detail or go to the Book A Gilding Class page for an up-to-date class schedule and Registration.

1.Eswarin, Rudy. “TERMINOLOGY OF VERRE ÉGLOMISÉ.” Journal of Glass Studies, vol. 21, 1979, pp. 98–101. JSTOR, http://www.jstor.org/stable/24190038. Accessed 11 Jun. 2022.

2.W.B. Honey, "Gold-Engraving under blass, The ConnoIsseur, 92. December 1933, pp. 2-375.

Gilding A Superyacht

Architectural Gilding At Sea

The Traditional Way

Superyacht, a term often used now for a commercially operated luxury yacht where one may find marble floors, spiral staircases - or, if you prefer - an elevator. And in this case, 900 feet of 23kt traditionally water gilded moulding.  

2013 saw the completion of Invictus, a year after I was contracted to gild the interior of the Executive Office on the top floor of this magnificent 850 foot-long ship.

When I first met with the shipbuilder and the Design team, we reviewed the plans for gilded mouldings that would later be fitted into routed grooves (see photo below) along with cove and floorboard mouldings that would combine gilding and black catalyzed varnish. 

The Plan

The presentation of various samples of gold leaf gilded mouldings resulted in a choice for water gilding due to its elegance and ability to balance the requirements of a hint of brilliancy against an aged appearance with a rubbed leaf over a dark, earth-red ground. The hermetically sealed design of the ship, of which I was informed is better than one's home, would provide a suitable environment for the water gilded gesso.

The final design plan was to use water gilded 23kt gold leaf, burnished over a custom-mixed dark red bole consisting of 50/50 German Red and Black clay. The leaf would be rubbed to expose the dark red bole and then toned with an umber-tinted Ruby shellac.

As for challenges, there are always difficulties with a large scale project that need to be confronted and resolved. In this case one of the larger issues was that the mouldings to be fitted into the wall panelings measured only a quarter inch wide and were joined at the mitres like picture frames so the mitre cuts wouldn't show. Unfortunately, once hydrated, the frames bowed in the middle causing some of the corners to pop open - I would sometimes actually hear them snap from across the room! - so the handling of these delicate mouldings proved very difficult, especially during burnishing. As the wall panelings were already meticulously painted the gilding needed to be done separately and the mouldings inserted. 

Applying weights on the corners of the frames after any hydrating helped stabilize them and after many hours all the various sized frames were finally gilded, toned, and installed successfully.

Going With The Flow

One of the aesthetic challenges was that some of the gilding was accomplished in the studio, some onsite in the manufacturers's workspace - the size of a small airplane hangar - and also onsite on the yacht itself in a separate hangar amongst the wiring, cables, woodworking, and painting of the yacht builders. The goal was to maintain a consistent antique color tone on all 900 feet of gilded moulding, executed under three separate lighting conditions while also envisioning how the appearance may change once the ship was launched where the lighting would change once again under natural conditions. The only true approach to this is to maintain awareness, make sure the toning recipe and application is consistent, and to not go too dark on the tone - it's always easier to make something a bit darker later than lighter.

In the end, the look of the water gilded gold leaf set against the deep, dark black elegance of the varnished walls and cabinetry was quite stunning. Several studio assistants were on hand to contribute their skills throughout this year long project: Madeline, Heather, Alyssa, and with a special thank you to Swedish Gilder, Restorer, and friend Malin Isaksson!

For those interested in studying gilding for use in architectural interiors Charles Douglas Gilding Studio offers both In-Person and Online classes. Visit the website page Gilding Class Information for more detail or go to the Book A Gilding Class page for an up-to-date class schedule and Registration.

Seeking the Meniscus...

Weights And Measures For Gilding Recipes

Often students will ask during the Traditional Water Gilding class whether the measurement of materials in gilding recipes should be by weight or volume when preparing rabbit skin glue size, gesso, and clay bole. I usually preface my answer by first pointing out that I prefer the metric form of measuring as I find it more exacting. 

When I switched many years ago from the US table of measurements to metric I performed a simple test: I measured by eye what appeared to be an ounce by volume of dry rabbit skin glue and then weighed it on a metric balance scale for comparison. Each time I performed the test the metric equivalent was different. That was convincing enough for me to make the switch to metric; I needed to match samples of gilded picture frame finishes as closely as possible and since there are so many things that can go wrong in gilding it's best to control what can be controlled and that would include the measurement and freshness of materials used in our gilding recipes. 

The question of whether to measure by volume or weight is a little more complicated. The equivalency of measuring materials by either of these two methods depends upon the material. Water may be measured either by weight or volume (1 ML of water = 1 gram). So which is better, to measure water by volume in a Graduate or weigh it on a metric scale? To answer this let me illustrate that in the past when I chose to weigh dry materials such as rabbit skin glue and whiting on a metric scale I measured water by volume in a Graduate, keeping the beaker as steady and even as possible for accuracy. However, I inadvertently discovered one day that a specific amount of water that I measured by sight of volume did not equal the same when weighed on the metric scale.

What Is A Meniscus?

The reason for the discrepancy is due to what is called the meniscus which is a curve in the upper surface of the water in the Graduate. A meniscus may be either convex or concave depending upon the liquid and the surface material of the object containing the water such as a glass beaker or plastic Graduate or burette.

What this means in practice for gilders is that the proper measurement of water in our gilding recipes whether it’s for the size solution, gesso, or bole requires viewing the surface of the water through the measuring container straight on so that the meniscus can be seen; it is the bottom of this curve that determines the proper measurement. As an example, if you are seeking to measure 50 ML of water make sure that the bottom of the curve is at the 50 ML mark.

Variances Between Volume And Weight

To discover how much difference there might be by virtually 'eyeballing' a certain amount of water in a Graduate I tested measuring by volume 50 ML of water without specifically looking for the meniscus but still seeking a measurement that seemed fairly accurate. I then weighed this amount of water on a metric scale with a result of 41grams! When making small batches of rabbit skin glue size or bole mixtures this nearly 20% variance could prove quite drastic, partially because we run the risk of using a glue size that is stronger than we think.

What we can learn from this is that we need to seek the meniscus of water when working with our gilding recipes if choosing to measure by volume. Considering the chance for error, however, it is simpler and safer to weigh the water on a reliable metric scale.

Gilding Terminology: From Gold Gild to 7 To 1

Expressions…And Other Oddities

Each field of life has its own way of talking, what we think of as nomenclature; expressions, idioms, or sometimes just a professional shorthand. So, as a little enlightenment (levity?) I list below a few of these turns of phrase or what have you that I have come across since I invented gilding…4,000 years ago. Or so.

Tifflings Anyone?

Skewings: Those little bits of leaf that are mere remnants of gold leaf that were actually used for something on a gilded project. These tiny bits on the table or floor could actually add up in a large company doing large frames, but for most they may at best be helpful somewhere down the road for spot gilding (I’m getting to tha!) but otherwise they end up getting mixed in what other forms of dust lay about and best left to return from whence they came.

Tifflings: The English word for - you guessed it - skewings! (See above)

Spot Gilding: Gilding the spots you missed the first time!

Gold Gild or it’s partner, Gold Gilding: Throughout the span of my years as a gilder my chosen field has always been known as gold leaf gilding. I remember because that’s what I wrote on my resumes when I wasn’t making any money. But now with the advent of Google someone decided to leave out a word and now it seems to have gone viral! Gold Gilding! Goodness sake, now I need to see my therapist. (Any New Yorkers out there?)

7 to 1, or even 4 to 1 or perhaps 5 to 1 (written 5:1)…Curious? What it is is 7 parts of distilled water to 1 part of 10% RSG (rabbit skin glue. Yeah, I know…). We use this concoction over water gilded gold leaf as a form of protection when the leaf isn’t burnished since burnishing compresses the gold into the surface and unburnished leaf isn’t afforded that so the 7:1 - or 4:1, 5:1) compensates. It’s also a nice way of cleaning those areas of little tifflings (!) and creates a somewhat more contrasting element to the burnished sections of the object. (See? I told you it was serious!)

Bole…Clay Bole…Clay: Water Gilding requires gesso to fill the grain of wood and to allow the gold leaf to be burnished. It also benefits from a few layers of Clay bole. Or Clay. Or Bole. See, we can’t quite make up our minds which it is. And then we add a 10% mixture of rsg to it. Or gelatin, depending on our choice. Or mood. And once this glue (the RSG….or Gelatin) is added we then call it Clay. Or Clay Bole. Or just Bole. It doesn’t seem to matter whether we have glue in it or not, it is it is.

The Tip: This is the flat, soft, often squirrel hair or Sable hair brush (of sorts) that we use to pick up gold leaf (to gold gild!). I have no idea where this name came from for this handy little tool but I’m sure someone will write in soon to enlighten me! And the Tip has always been made with…a cardboard handle? Hmmm.

Gold Gild: Yes, I know I used this one already. But you see, in the world of SEO ( search engine optimization) we have these things called Keywords and folks have really been using gold gild a lot to find us esoteric gilders and my SEO guru says I need to use it more…

Interlaggio: Even my gilder friends are stumped when I use this one (that’s why I like it!:)). It’s a small piece of fabric (or Japanese or Mulberry paper) used over a mitre or joint to help prevent cracking of the gesso. A great term, even if no one else remembers it. Or maybe I’m wring? Ha! Never :).

Ancient Mordants: Mordant is simply another word for adhesive, it just sounds better. Many of these mordants over the centuries come from the Vegetal Kingdon such as Garlic, Gum Ammoniac, Figg Juice. Others take us back to the 12thc as described in the Treatise by the Benedictine Monk Theophilos. Believe me, you don’t want to go there. ~

So this is the beginning of which I’m sure to add to. Over time. Or not. ~ Happy gilding!

Gilding With Water-Based Emulsion and Oil Size

Water And Oil-Based Sizes

The process of gilding wood involves the use of either of two methods: Traditional Water Gilding and Mordant gilding, often with the use of Oil Size. Sometimes the two methods are combined on the same object for different effects. However, if we oil gild with an oil size, what are we doing then when we gild with a water based acrylic emulsion? Good question!

The modern day acrylic emulsions for use in gilding - the Dux brand is one that comes to mind - are water based but are certainly not to be confused with traditional water gilding, a centuries old, complex method of gilding that allows burnishing of the gold or silver leaf with an agate stone. Since acrylic emulsion sizes are not oil based they cannot be categorized as oil gilding. So what are they?

Oil gilding uses a linseed oil-based varnish-like medium which we call oil size. The term size implies an adhesive. Oil sizes are referred to according to their drying times: slow size and quick size. Within these two parameters there are actually a number of different drying times available - usually 1 hour, 3 hour, 12 hour or more. The hour designation refers to the approximate length of time it takes for the size to reach the appropriate tack window needed to begin gilding. This window of time, where the size is just tacky enough that when you draw your bare knuckle across the oiled surface you hear a squeak, eventually closes to the point where the oil size will no longer adhere the leaf to the surface.

Oil Size: Quick And Slow

A slow dry oil size, a term that is reserved for the 12 hour or longer versions, have the longest open windows of any of the oil sizes and the greatest leveling properties. It takes a fairly long time to reach the window when one can begin gilding - approximately 12 to 17 hours for the 12 Hour - and remains open for quite some time after that, perhaps 36 hours or more depending upon weather conditions.

A quick oil size comes to tack quickly but will leave its window quickly as well. It usually stays tacky enough, however, to do a small job nicely. I sometimes mix a slow and a fast dry Dux brand oil size at a 80:20 ratio (Slow:Quick) to gain greater control over the drying time.

So with all this talk about oil size, where are we with acrylic emulsion? After applying the emulsion size to the surface, it behaves like oil size in that it needs to have time to set up and a window that eventually (emphasis on eventually!) closes. But it's not oil gilding. It's water-based but it's not water gilding.

The explanation is actually quite easy. This is the umbrella term initially mentioned that covers both oil gilding and acrylic emulsion: Mordant Gilding. A mordant is an adhesive medium that is used as a binder for gold leaf as well as silver and other metal leafs. In fact, oil size and acrylic emulsions are only two mordants; historically, a variety of binders, or mordants, have been used in gilding including garlic, glair (egg white), gum ammoniac, fig juice, and gum tragacanth.

Acrylic Emulsion: Pros And Cons

The new acrylic emulsions have some positives and negatives. They are water-based, therefore clean up easily with soap and water allowing you to avoid the somewhat messy mineral spirits and gummy residue associated with oil size. However, oil size, especially the slow dry, is nicely self-leveling, whereby an acrylic emulsion essentially lays the same way that it's brushed onto the surface, so you need to finesse it carefully by feathering it out. But the acrylics can be gilded after about fifteen minutes or as long as thirty-six hours. I tested a piece recently and gilded a board after the emulsion size had dried for thirty-six hours and it gilded very well with great retention. I actually had an instance where I gilded an artist’s board where the window stayed open for a week and gilded fine, which may or may not be a plus unless you're gilding some very large walls! But the end result still can be quite nice although I do enjoy the sense of harder curing of the oil size but I find there is room for both depending on the project.

The one thing that can be bothersome about the acrylic emulsion is the brush marks left in the size since it isn't very self-leveling. But it's certainly worth working with if you have a good touch and are good with a brush, and if working on a canvas with its inherent texture these brush marks can go into the background. Be mindful though on the type of project you use it on because it never seems to completely dry hard if you’re used to working with oil size. If it's not a piece that's going to be handled and is given a light shellac coat, then by all means try it and see if you can use it in your own work. The flexibility of acrylic emulsion on such surfaces as canvas and leather is amazing which is likely related to its tendency retain a slight tackiness. So if flexibility is a requirement for your project it could well be worth the tradeoff! ~

For those interested in studying gilding Charles Douglas Gilding Studio offers both In-Person and Online Classes including studies in Glass Gilding, Verre Églomisé, Mordant Gilding, and Traditional Water Gilding. Visit the website page Gilding Class Information for more detail or go to the Book A Gilding Class page for an up-to-date class schedule and Registration.

Single Gilding Versus Double Gilding

Double Gilding

An object that is double gilded has two layers of gold leaf laid, one atop of the other. This is normally done with the traditional water gilding method and imparts a very deep, golden tone that is generally free from defects in the gilding. Water gilded leaf has a satin tone in its natural state; burnishing the gold or silver leaf brings the metal to a brilliant lustre.

When water gilded leaf is left satin, it's left un-burnished. This means that the leaf not only has a satin tone but is also not compressed into the clay bole that is applied to the underlying gesso such as a gilded picture frame furniture, or other wooden object and therefore bonding of the gold leaf to the surface is somewhat more vulnerable to wear. It has historically always been this way and old water gilded frames and furniture that have unburnished satin areas will likely show more wear than their burnished counterparts. Therefore, I often use additional 10@ RSG (rabbit skin glue) or gelatin in the gilding water for unburnished areas to aid in adhesion. I also sometimes sometimes apply a 5:1 10% Glue to Water wash over the satin leaf for added protection.

Spot and Single Gilding

Single layer water gilding sometimes results in some anomalies ('spots' exposing underlying clay bole from trapped air bubbles or breaks in the leaf) during the process of gilding, many of which can be covered during spot gilding, although if done excessively the result can be somewhat unsightly due to ghost images of these small sections of leaf applied over existing gilded leaf. Double gilding covers all the anomalies that single gilding sometimes leaves behind and is useful when gilding satin areas. It offers a very solid layer of gold leaf.

There are times, though, that the somewhat translucent quality of single water gilding is preferred when developing a satin section, especially when other areas of the water gilded object are rubbed, abraded, or distressed. As an example, a picture frame that is antiqued to some degree can be a little jarring if the sides are a strong solid double gild. It is often aesthetically best if the overall appearance of the gilding presents a sympathetic quality between each of the gilded sections, where no one area is dramatically different in its condition.

The technique of Double Gilding is demonstrated in the Water Gilding for Panels Online gilding class which is discussed on the website page for Gilding Class Information.

Mordant Gilding: Oil Gilding and Water Based Mediums

Oil and Water-Based Mordants

Mordant Gilding is a term used in gilding that relates to the use of an adhesive medium and considered an alternative method to Traditional Water Gilding. There are various mordants that we can choose from when gilding although Oil Size for Oil Gilding and Water Based Adhesive (a white acrylic emulsion) are two popular mediums in contemporary gilding alongside Instacoll and Miniatum Ink by Kölner. Oil size is used for a wide-range non-porous objects and surffaces from the smallest of picture frames to the tops of the tallest of buildings and Domes while acrylic emulsion is often found on Interior Walls and artist’s canvases.

Ancient Mordants

Glair, garlic juice (Ilinocopia), and gum ammoniac are prepared as aqueous mordants, three very old bonding mediums used for adhering gold leaf to such objects as paper, glass, and statuary. Glair, discussed by Ceninni in his 15th c Treatise Il Libro Dell’Arte, is beaten egg white mixed with a little water and allowed to sit out overnight and the froth removed the next day. It provides a strong bond and when weakened with additional distilled water it’s brilliancy on glass can rival that of the more often-used gelatin size.

Gum Ammoniac, a gum resin that exudes from the stem of the herb Dorema Ammoniacum can be found in Iran and Northern Africa. It is used by Calligraphers and historically goes back centuries for use in Manuscript Illumination. Through my own exploration I have found it also to be a candidate for gilding on glass to achieve a bright gild.

For those seeking ways to gild on leather, glair has been the traditional medium for bookbinding and bookedge gilding. However, acrylic emulsion is also a quick and decoratively successful way of gilding the smooth side of leather which, showing through my recent testing, to be a very flexible mordant for leather.

For those interested in studying mordant gilding including oil gilding and water-based adhesive (acrylic emulsion) Charles Douglas Gilding Studio offers both an In-Person and Online class titled: Gilding for Works of Art…a Study for Fine Artists as well as a new four-part Series: Gilding…For Absolute Beginners. Visit the website page Gilding Class Information for more detail or go to the Book A Gilding Class for an-up-to date class schedule and Registration.

A Primer for Aspiring Gilders: Methods, Binders, and Gilding Terminology

What Exactly Is Gilding?

To many of the uninitiated, intrigued by the beauty of gold leaf, one of the first questions I hear concerning gilding is “what makes it stick?”. It’s actually a long answer, depending on the method of gilding, historical reference, and personal choice.

Gilding, which is the application of a metal leaf to another surface is comprised of three main methods: Water Gilding, Mordant Gilding, and Glass Gilding/Verre Églomisé. Water Gilding is used primarily on wood although can also be performed on plaster, hydrocal, and a mould-making material known in the Framing and Furniture world as Compo. Mordant Gilding which includes such adhesive agents as oil size and acrylic emulsion is designed for any non-porous surface from sealed wood and glass to stone and walls. Glass Gilding can be performed on either the front or the back of glass, from mirrors and tabletops to decorative glass sculptures and gilded and painted sceneries of age-worn Grandfather Clocks.

Within these methods lie the techniques used for Byzantine, Russian, and Greek Iconography, Manuscript Illumination, 13th-18th c Florentine gilded panel paintings; the gilded architecture of Cathedrals and Domes and Palaces; the ornate picture frames of French, Italian, Flemish, and early American design; Asian temple woodcarvings, Tibetan metal work; the decorative effects of raised gesso for calligraphy or its use on frames and furniture in the form of pastiglia; the beauty of egg tempera paint over water gilded gold leaf and etched away in a method known as sgraffito; and the gesso treatments of granito. The uses of gilding throughout the centuries seems endless.

Water Gilding

Traditional water gilding generally involves rabbit skin glue and/or gelatin; glass gilding/verre églomisé uses a food grade gelatin for bright gilding or oil size for contrasting matt sections although glair - beaten egg white - can also be used as described by Ceninni in his 15th c Treatise Il libro dell’Arte for religious reliquaries which also leans matt, depending upon the strength. Oil size is a popular bonding medium in mordant gilding alongside other mordants including garlic, gum ammoniac, and contemporary acrylic emulsions. The use of these mordants extend from oil gilded interior and exterior architecture to the application of glair and gum ammoniac for manuscript illumination and bookedge gilding.

Each of these bonding mediums carry their own characteristics and purpose of use. Referred to as Size, many mordants such as oil size and acrylic emulsion (sold as water-based adhesive) are applied topically to a non-porous surface and allowed to dry to a slight tack on which the gold, silver, or other precious or non-precious metal leaf is applied. Both of these adhesive materials are considered mordant gilding. While we often hear of the popular term oil gilding, there is no separate term other than mordant gilding for gilding with acrylic emulsion and despite it being water-based it would be incorrect to refer to it as water gilding, a completely different method of gilding rooted in antiquity dating back over several thousand years.

Traditional water gilding involves a protein binder throughout the process. My method of practice begins with preparing a 10% rabbit skin glue (rsg) solution: 1 part dry granules to 9 parts distilled water. Once the granules soften overnight they are heated in a double boiler until dissolved, the mixture never surpassing 120F to avoid destruction of the enzymes which would affect the adhesive quality of the glue. The wood object to be gilded is then coated with a layer of the heated size and left to dry 24 hours, allowing the wood time to re-stabilize from the hydration.

Rabbit Skin Glue As A Binder

The Rabbit skin glue solution is also used to prepare gilder’s gesso, a combination of 10% rsg, additional water, and calcium carbonate or calcium sulphate which is applied to the sized wood. 10% rsg is also used in the preparation of the clay bole and applied over the gesso. A 10% solution of gelatin can be used for the bole instead of rsg as a matter of preference as it doesn’t require the lengthy soaking time as the rsg granuals.

The term gesso is used to convey foundation or ground. I have recently come to refer to it simply as gilder’s gesso to help differentiate it from other forms of gesso such as oil or acrylic-based. They are all referred to as gesso which can be confusing as the term is shared but the materials that are used in their manufacture are quite different. Although they each form a ground, a painter will use gesso to isolate the canvas from the effects of oil paint while a gilder will apply gesso to wood to fill the grain and in the case of water gilding, to burnish the gold to a high lustre.

During water gilding, the gold leaf is laid over the clay bole once the bole has been sufficiently hydrated with water and alcohol, reactivating the glue in the clay which bonds the leaf to the surface. The leaf is then later burnished to a beautiful brilliancy. Often the gold leaf is left matt in specific sections of the gilded object for contrast to the burnished areas.

Clay bole is obtained as either a dry cone which gilders will then grind or tumble in a ceramic tumbler known as a Ball Mill as I do with water and tumbling stones until creamy or it can be purchased pre-mixed where the clay has already been tumbled and mixed with water. This clay is then combined with a specific amount of dissolved rabbit skin glue or gelatin and applied over the gesso that has been sanded smooth. The clay provides a sympathetic color under the gold or silver leaf and aids in the effectiveness of the burnishing with an agate stone burnisher.

Gilders will often use the terms Clay Bole, Clay, or Bole interchangeably. Intriguingly, this holds true whether the clay bole is in its raw dry cone or pre-mixed state and whether or not it has been combined with the glue size. This is important to note since protein binders such as rabbit skin glue and gelatin have a short shelf life once mixed with water and should never contaminate the raw form of the clay bole which normally sits on the gilder’s shelf as it will turn the container of raw clay rancid and useless. The rabbit skin glue or gelatin should only be used to create what I call prepared bole - the solution of clay, water, and glue which is used while gilding and stored in the refrigerator when not in use.

Protein binders such as rabbit skin glue can last many months in their dry state when stored in a glass container and cabinet but breakdown fairly quickly once combined with water. Depending upon the temperature setting and condition of refrigerators, two weeks is generally a good guideline for maximum life of the prepared glue, whether in the form of the 10% water and glue size, the prepared clay bole, or the gesso. When any of these prepared materials for gilding deteriorate, which could be between 2-4 weeks in the refrigerator, the prepared glue size, clay, or gesso will develop a soft, watery texture and eventually a strong odor if left passed their prime due to the presence of the rsg or gelatin as they are both protein binders and should never be used once deteriorated since the adhesive quality will be greatly diminished.

Mordant Gilding

The method of mordant gilding with either oil size or acrylic emulsion is less time intensive than traditional water gilding although each step is very important to be done correctly to achieve an attractive gild and to avoid any stressful mishaps from wet or pooling size.

Unlike water gilding which requires a porous surface, mordant gilding requires a non-porous surface. Technically, raw wood could simply be given numerous coats of shellac to reduce the porosity on which oil size or acrylic emulsion can then be applied. Once the size dries to a tack the leaf is laid and gently compressed with either a soft pounce pad or light pressure through the thin rouged paper inside the gold leaf booklets or whatever is the gilder’s preferred method for smoothing the leaf. However, although a porous surface can be made non-porous there are other steps a gilder can take to create a more attractive gild than simply gilding over shellac-sealed wood.

I often apply six coats of gilder’s gesso to wood frames and furniture to fill the grain, sand the gesso and apply a Primer and enamel paint as an undercoat before oil gilding, or an acrylic paint as an undercoat for gilding with acrylic-emulsion, providing a nice foundation free of the presence of wood grain while the paint seals the porous gesso and offers an attractive color under the somewhat translucent gold leaf. Other preparatory treatments are often necessary for other surfaces such as metal, especially for exterior work for successful bonding and longevity.

Verre Églomisé

Gilding on glass is a method that I often refer to as Glass Gilding or by the French term Verre Églomisé, named after the 18th c French Dealer and Restorer Jean-Baptiste Glomy (1711-1786) who reintroduced the ancient Roman technique of gilding and painting on the back of glass.

As a weak size made of gelatin dissolved in water is used, some refer to this method as water gilding which I refrain from to avoid confusion with traditional water gilding. The form of gelatin used for glass gilding today comes in the form of a clear, short rectangular sheet with perforated diamond shapes for ease in measuring. Pharmaceutical capsules have also long been used and some gilders prefer these although in either case, the gelatin should be stored in a glass jar in a cool cabinet. Prepared as a water-based mordant it is best to use fresh gelatin as age can affect adhesive quality. A clear, crisp snap of the gelatin ‘diamonds’ is a good indication of fresh quality.

For the beginning gilder it is perfectly good to choose a path of specialization in a particular area of gilding, whether as a water gilder of frames or furniture, a hand-letterer on glass, a manuscript illuminator, or a restorer of gilded antiques. Whether someone chooses to specialize or to become proficient in a variety of methods and techniques it’s beneficial to acquire an overall knowledge of the various forms of gilding, their history and purpose of application. It can be helpful in a business context and in the sense of self as an artist, in one’s confidence, choices, and opportunities that may come along.

For a full listing of classes the full curriculum is currently being added to the Gilding Class Information page. ~

For those interested in studying gilding Charles Douglas Gilding Studio offers both an in-person and Online Classes including studies in Glass Gilding, Verre Églomisé, Mordant Gilding, and Traditional Water Gilding. Visit the website page Gilding Class Information for more detail or go to the Book A Gilding Class page for an up-to-date class schedule and Registration.

A Gilder’s Journal

My personal Blog

A Gilder’s Journal, tells the story of some of my projects which stand out to me for various reasons, from water gilding to glass gilding and inbetween oddities; thoughts on gilding, and educational tips and tricks (a bit of the magic that we often speak of!) has been told for many years on the Blogger platform. I am happy to say that the Blog is in the process of navigating over to this website where you’ll be able to access all the previous posts from earlier writings along with the up-to-date stories yet to come. I hope you’ll find this helpful for your own journey.

For those interested in learning gilding (some say gold leafing, same thing when working with gold leaf!) please visit the section Book a Class to browse through the variety of gilding classes offered both online and in-person. You’ll find classes on water gilding, oil gilding, gilding for works of art, glass gilding/verre églomisé, and specialty Masterclasses such as Pastiglia, Sgraffito, and tutorials on Clay Bole and Laying Leaf.

Till soon…

~Charles